So you know what it's like - your PC is beginning to slow down, things are taking longer than they need to. Plus, for a reason you can't work out, Windows 11 will only let you have 5 uninterrupted minutes of functional trackpad at a time. So, what does somebody in this position do?
They reinstall Windows? Well no - I DON'T WANT TO REINSTALL WINDOWS YOU CAN'T MAKE ME. The natural option is of course to install Debian 12 (dual boot) and then make it look like Windows XP. Yes, you heard that right - the venerable OS of my childhood - Windows XP.
The very first first real computer I operated had it installed by default. It had that monitor which crackled when you turned it on and I had my very own dirt bike icon (despite never being interested at any point in operating or owning a dirt bike). Indeed, with MSN Messenger it was my first foray at a very early age into making mistakes online social media.
So, back to reality - it's now the year of our lord 2023 and Windows XP is fully dead, having exhausted 13 years work of support from Microsoft. And unless I wanted two copies of Windows, where one feeds the other all kinds of malware like an evil mother bird, to scratch the nostalgia itch I'd have to theme up a Linux install to look the same way.
The Instructions
The final product you'll end up with looks something like the below screenshot.
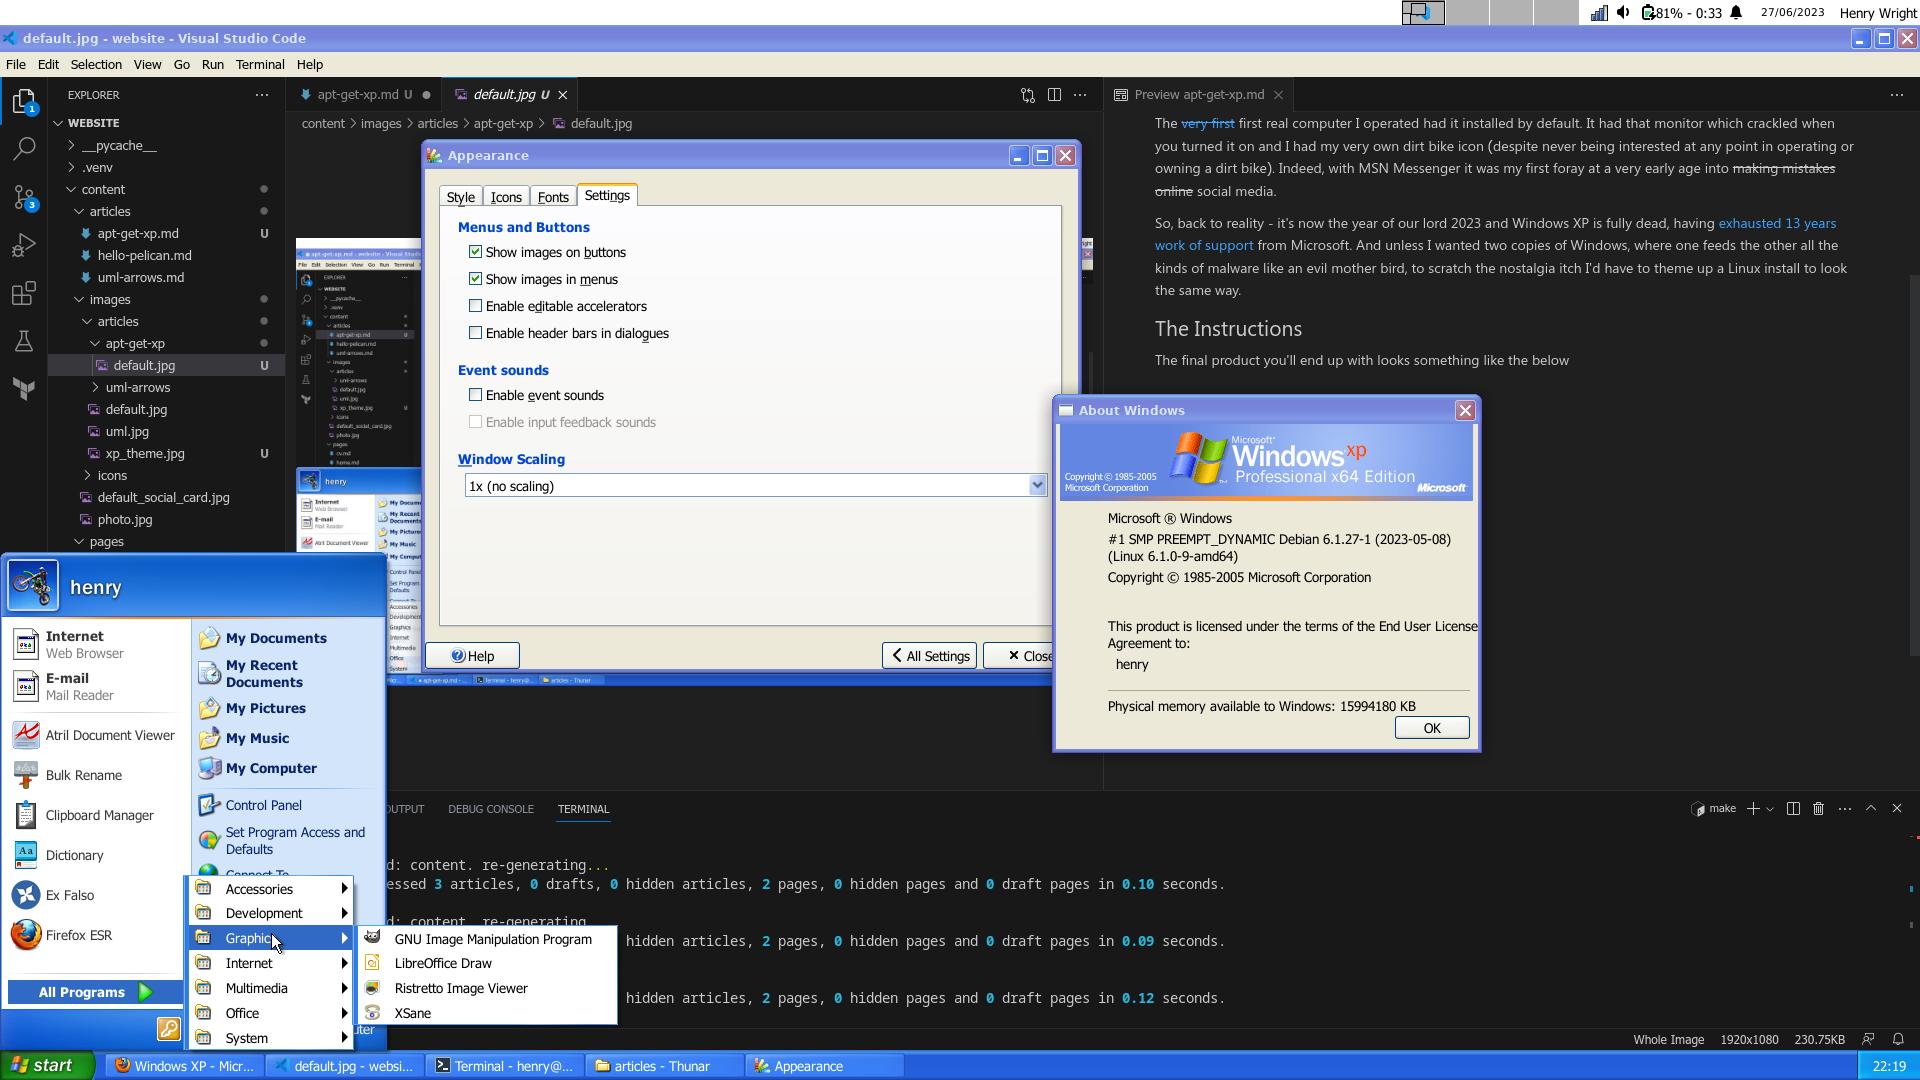
These instructions assume you are using Debian 12 and have installed xfce as your desktop environment of choice.
Step 1 - Install Build Tools and Download Code
This tutorial will show you how to install from scratch the very very very excellent xfce Windows XP Total Conversion project by rozniak over on GitHub. More documentation is contained within that repository, but if you just want to get on with it, keep on reading.
What we'll be doing is compiling, packaging and installing several .deb packages in turn and then configuring these, but we'll first need to ensure we have all the required tools. Much of the code is written in C, so we need the standard build tools plus the libraries that the project depends on.
We can do that by running the below commands:
sudo apt-get update
sudo apt-get install build-essential cmake gettext git libgarcon-1-0 \
 libgarcon-1-0-dev libgarcon-gtk3-1-0 libgarcon-gtk3-1-dev \
 libglib2.0-dev libgtk-3-0 libgtk-3-dev libwnck-dev libwnck-3-0 \
 libwnck-3-dev pkg-config sass
Then navigate in your terminal to the folder you want to download the code to and run:
git clone https://github.com/rozniak/xfce-winxp-tc.git --recurse-submodules
This will download the code. The next step will be to compile and install the various packages in the correct order.
Step 2 - Build and Install
Each element of the theme can be built and installed individually depending on what level of theming you desire. I'll show you how to do all of it but you can stop the ride at any point if you want to get off...
For all of these instructions you'll need to be in the /packaging/deb folder so if you're not already within that folder, navigate over there:
cd xfce-winxp-tc/packaging/deb/
Shared Libraries
This installs several of the common libraries used by other parts of the project software
./bldnpkg.sh shared/comgtk
sudo dpkg -i libwintc-comgtk.deb
./bldnpkg.sh shared/exec
sudo dpkg -i libwintc-exec.deb
./bldnpkg.sh shared/shllang shared/winbrand
sudo dpkg -i libwintc-shllang.deb
sudo dpkg -i libwintc-winbrand.deb
Cursors
There's an option with shadow, and without - but no harm in installing both and deciding later
./bldnpkg.sh cursors/no-shadow/standard cursors/with-shadow/standard
sudo dpkg -i wintc-cursor-theme-standard-no-shadow.deb
sudo dpkg -i wintc-cursor-theme-standard-with-shadow.deb
Fonts
All the Windows XP system fonts, all in one go - without Tahoma it won't be coming home-a-to-me. (sorry)
./bldnpkg.sh fonts
sudo dpkg -i wintc-fonts-xp.deb
Icons
Iconic.
./bldnpkg.sh icons/luna
sudo dpkg -i wintc-icon-theme-luna.deb
Theme
This is what makes everything look BLUE in the classic XP Luna theme - the project does provide others which you can install if you wish (themes/professional and themes/native), but I'll not bother with here.
./bldnpkg.sh themes/luna/blue
sudo dpkg -i wintc-theme-luna-blue.deb
Custom Programs (Taskbar, Winver, Run)
Of these, the taskbar is most important to complete "the look", but let's do all for good measure.
./bldnpkg.sh shell/run shell/winver
sudo dpkg -i wintc-shell-winver.deb
sudo dpkg -i wintc-shell-run.deb
./bldnpkg.sh shell/taskband
sudo dpkg -i wintc-taskband.deb
At this point, restart your system and you'll be ready to start configuring.
Step 3 - Configure
Select icons, theme and fonts
- Go to Applications -> Settings -> Appearance
- Toggle "Set matching Xfwm4 theme if there is one" to yes
- Select "Windows XP style (Blue)"
- Click on the "Icons" tab
- Select "Luna"
- Click on the "Fonts" tab
- For Default Font select "Tahoma Regular" at size 10
Change cursor style
- Go to Applications -> Settings -> Mouse and Touchpad
- Click on the Theme tab
- Select Windows XP Standard (with or without shadows as you prefer)
Modify the panel
First verify the XP taskbar program is working by entering wintc-taskband into a terminal. The taskbar should pop up on the bottom of the screen. Press Ctrl+C to end it.
Ensure it starts up on every xfce session by:
- Go to Applications -> Settings -> Session and Startup
- Click the Application Autostart tab
- Click on "Add"
- In the dialog that opens enter Name as "XP Taskbar", Description as "XP style taskbar" and Command as "wintc-taskband" - ensure Trigger is set to "on login"
Since the custom XP taskbar doesn't support several useful features such as wifi, battery display, workspace switching yet - we'll keep the top panel for status and widgets but remove the app menu and program buttons.
- Right click the xfce panel and go Panel -> Panel Preferences
- Click on the Items tab
- Remove the "Applications Menu" and "Window Menu" items
- Make any other changes on Appearance and Display tabs to fit your preference and then hit "Close"